|
Installation
1.
|
If you are installing over a previous install of FoldMonkey then it is recommended that you terminate all FoldMonkey services, close all open FoldMonkey windows and un-install FoldMonkey from your computer before installing again. |
2.
|
Click HERE to download the FoldMonkey installation package. |
3.
|
Double click the file "FoldMonk.exe" (the file that you downloaded in step 2 above) and then follow the installation instructions. |
If you have any installation problems, contact us
|
Uninstall |
Terminate all FoldMonkey services and close FoldMonkey. Then select the "Uninstall FoldMonkey" shortcut in the FoldMonkey folder of your start menu.
If this does not work then you can manually uninstall FoldMonkey. First, close FoldMonkey. Then, find the folder that FoldMonkey is installed in (This is typically something like "C:\Program Files\FoldMonk"). Delete this folder.
|
 Update Update
| Registered Users: Launch your registered version of FoldMonkey. Select "Online" and then select "Update" from the system tray menu. Alternatively, refer to your original order receipt for instructions or contact us. |
| Un-Registered Users: Click HERE to download the latest version. |
Monitoring A Folder
|
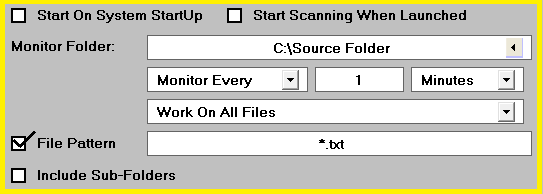
From the settings window, you can change how FoldMonkey functions. You can access this window by right clicking on the system tray icon and selecting "Settings"

Start On System StartUp:
| |
Check this box to start FoldMonkey each time windows starts.
|
Start Scanning When Launched:
| |
Check this box to start scanning using the options in the Settings window each time FoldMonkey is launched.
|
Monitor Folder:
| |
Enter the path of the folder that you wish to watch here. Any files found here will be worked on. Files in sub-directories will not be worked on.
|
Change:
| |
Click this button to change the folder that FoldMonkey monitors. This will open a window where you can select the new folder from a folder tree. Double click a folder in the folder tree to select it.
|
Monitor Every:
| |
To Monitor a folder for incoming files, FoldMonkey must scan the folder at regular intervals. Set your intervals in this section. Enter a number in the center box and select a unit of time from the drop down menu on the right. For example, enter 1 and seconds to set FoldMonkey to watch the target folder for new files every 1 second.
|
Monitor At:
| |
You can monitor a folder only once a day at a specific time. You can enter the time in this box.
|
File Pattern:
| |
Only work on new files that match this pattern. Use * to represent any text. Use ? to represent any single character. Separate multiple patterns using a semi-colon (;). Examples:
Enter * to work on all files.
Enter *.txt to work on txt files.
Enter ????? to work on files which have 5 character file names.
Enter A*.txt to work on txt files that start with A.
Enter *.txt;*.html to work on txt files and html files.
|
Include Sub-Folders:
| |
Check this box to Include files in sub-folders. FoldMonkey will work on new files found in all sub-folders of the current target folder. If you are using a pattern mask, FoldMonkey will ignore all files that do not match the pattern.
|
|
Renaming New Files
Check the "Rename New File" check box to rename each new file found. This will rename the file according to the pattern that you define using the options in this section.

|
New File Name Text Box:
| |
New files will be renamed to the pattern that you enter in this box. You can enter text by directly typing or by using the tags supplied by the "Add Text" button.
| Add Text Button:
| |
Click this button to add tags to the "New File Name" text box above. For each new file, the tags will be replaced with the corresponding information.
What tags are available?
|
|
Archiving Files
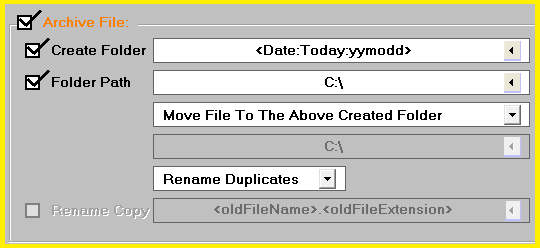
For file archiving options, check the "Archive New File" check box. You can use this section to create a folder each time a new file is found and/or copy or move each file as required.

|
Create Folder Check Box:
| |
Check this box to create a folder each time a new file is found. If the folder already exists then the folder creation step will be skipped. The folder created will match the pattern in the corresponding text box.
| Create Folder Text Box:
| |
Enter the new folder name here. You can enter text by typing it in or by using the tags supplied by the "Add Text" button. You can create sub-folders by separating individual names with a back-slash \
| Add Text Button:
| |
Click this button to add tags to the text box above. For each new folder, the tags will be replaced with the corresponding information.
What tags are available?
| Folder Path Check Box:
| |
Check this box to create new folders on a specific path. If this box is not checked, folders will be created in the same folder as the current file.
| Move File To The Above Folder Option:
| |
Select this option to move the file to the folder that was just created above. If the folder already existed then the file will still be moved to that folder.
| Copy File To The Above Folder Option:
| |
Select this option to copy the file to the folder that was just created above. If the folder already existed then the file will still be moved to that folder.
| Move File To Option:
| |
If you wish each new file to moved to a specific folder then select this option and enter a path in the box below. Click on the Change button to select a path from the folder tree.
| Copy File To Option:
| |
If you wish each new file to copied to a specific folder then select this option and enter a path in the box below. Click on the Change button to select a path from the folder tree.
| Do Not Move Or Copy File Option:
| |
Select this option to leave the file in its current folder.
|
Rename Duplicates Check Box:
| |
Check this box to rename duplicates if found. For example, if you are copying file c:\myfile.txt to folder c:\myfolder, and the file c:\myfolder\myfile.txt already exists, the copy will be renamed with a unique name, typically c:\myfolder\myfile2.txt.
|
|
Launching Programs
Check the "Launch Program" check box for program launching options. You can use this section to launch 3rd party programs or custom scripts each time a new file is found. For example, if you wish each new file to under-go further processing, you can send each file name and path to a batch file.

|
Wait Check Box:
| |
Check this box to pause scanning until your program or batch script has terminated.
| Program Text Box:
| |
Enter the fully qualified path to the program or script that you wish to launch. You can find the program by clicking the "Select" button.
| Parameters Text Box:
| |
Enter the parameters that you wish to send to the program or batch script. You can use this box to send information such as file name and path.
For further instructions please click HERE.
| Add Text Button:
| |
Click this button to add tags to the parameters box. For each file, the tags will be replaced with the corresponding information.
What tags are available?
|
|
Main Controls
|

Status Bar:
| |
Displays the current scanning status of FoldMonkey.
| Service Button:
| |
You can set up FoldMonkey to run as a service. For more information, please see:
What is a service anyways?
How do I set up FoldMonkey to run as a service?
| Scan Once Only Button:
| |
Click this button to scan the target folder once only. All files found will be renamed and moved according to the options that you have set above (if you have set no options then no action will be taken)
| Start To Monitor Button:
| |
Monitor the target folder. Scan the folder at the time intervals selected at the top of the settings window. At each scan, rename and move files according to the options selected in the Settings window. If no new files found, take no action.
| Stop Button:
| |
Stop the current monitoring cycle (if currently monitoring the target folder).
| Hide Button:
| |
Hide the Settings window. You can open this window again by selecting the "Settings" menu item from the right click system tray FoldMonkey icon.
| Exit Button:
| |
Remove FoldMonkey icon from system tray. Close FoldMonkey. |
|
System Tray Menu Items |
FoldMonkey runs from the system tray. To access the FoldMonkey main menu, right-click on the FoldMonkey icon in the system tray.

Settings
| |
Select this to open the settings window. The settings window is the main interface of FoldMonkey. From there, you can determine how you would like FoldMonkey to run. |
Stop Monitoring
| |
Click this to stop monitoring the current target folder. |
Online/Contact Us
| |
Send us a message from our website |
Help/About
| |
Provides basic information about FoldMonkey |
Help/Auto-Help
| |
Check this menu item to receive auto-help (tool-tips). When you hover over an item in the "Settings" window with your mouse pointer, a tool tip will appear providing help with that control. To stop this from happening, un-check this menu item by clicking it once. |
Help/Contents
| |
Open this help file. |
Exit
| |
Click this button to completely close FoldMonkey. This will remove the system tray icon. |
|
Command Line Switches |
FoldMonkey supports the following command line switch:
/scanonce
This switch will load FoldMonkey, scan once and then close FoldMonkey.
For example, using a Windows XP batch file, you can call FoldMonkey using the following code:
@echo off
cls
start "" "C:\program files\foldmonk\foldmonk.exe" /scanonce
cls
exit
|
|
 Update


